Friday, November 30, 2012

Mr. Krueger's Christmas

Last night, we had some down time and decided to watch a Christmas movie together as a family. We don't own very many (which is why I got on Amazon.com and bought six different Christmas themed movies the other day), but there is one that I always make sure to watch.


Mr. Krueger's Christmas. 

It's an older movie, made back in 1980, so we popped it into the VHS player (amazing we still have one of those) and started watching. I love this movie. Not only because Jimmy Stewart is the leading role and because he is the cutest old man and reminds me of my sweet grandfather, but because of the message it teaches and the tears of the true Christmas spirit it brings to your eyes. Mr. Krueger's Christmas is about Willy Krueger, a kind and lonely widower living alone in a basement apartment he is custodian to. The story follows what happens to him one Christmas Eve as he goes to purchase a tree and nearly spends the holiday alone. Although he makes a few attempts to be with someone, his desires are sadly overlooked and no one seems to notice the company this old man needs. No one except a sweet little girl, Clarissa, who is out caroling with her family. Through the events of the night, Mr. Krueger finds the true reason to celebrate the season and prayerfully thanks the infant Jesus for being his closest friend through his struggles.

This movie is fun and has some very enjoyable and touching scenes. There are a few instances where the audience gets a look into Mr. Krueger's imagination, which are happy and lovely and of course, my favorite parts. From images of directing the Mormon Tabernacle Choir to being a well-known man purchasing a new suit in a department store, there is one scene from Mr. Krueger's mind that stands out the greatest. While he is rearranging his nativity Mr. Krueger imagines himself there in the stable at the baby Jesus' side.  It is at this part that one of the greatest, most touching, and most meaningful monologues ever is given. It is clear that Jimmy Stewart doesn't just simply act out this part, but the  message of gratitude, faith, and love were truly from his heart and soul. "I love you," says Mr. Krueger to the Savior. "You are my closest and finest friend. And that means I can hold my head high, wherever I go."

The message that is given in this film is beautiful and one to remember even throughout the year. It is summed up in one, conclusive line. "I love you. That's what Christmas is all about. Clarissa said it to Mr. Krueger. Mr. Krueger said it to Jesus. And Jesus, in so many ways, has said it to all of us."

  • Age Appropriateness: All ages. Of course, it probably wouldn't hold a small infant or toddler's attention for long, but even young children would enjoy this movie. Plus it's only about 15 or 20 mins, so it isn't long either.
  • Content Rating: G. Super G. There is absolutely nothing objectionable about this movie. :)
  • Overall Rating: 5/5 stars. I've already stated my reasons above, but I simply just adore this movie. Unfortunately, I don't believe it is a very well-known film, so I'm not sure how accessible it would be to get a copy. However, if you can't find it to rent anywhere (which I highly doubt it is), it may very likely be available to watch on YouTube at this link: https://www.youtube.com/watch?v=AG2xdsKNXy8 (In fact I think it is very likely and very available. But you didn't get this from me. ;) )
Now go watch this wonderful movie! Merry Christmas! :)


Movie Poster from http://www.listal.com/viewimage/1584223
 

Tuesday, November 27, 2012

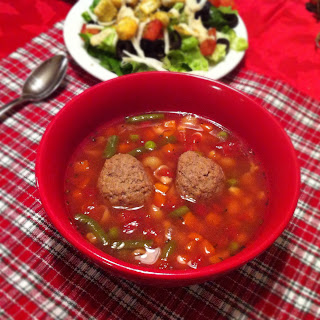
Meatball and Vegetable Soup with Pasta

Easy schmeasy yummy soup recipe! Just in time for the cold winter season. :)

Ingredients:

 (Yes, I shop at Walmart...)

3 14-ounce cans beef broth (You can also use the bigger 32 ounce box plus one 14 ounce can instead. Sometimes the boxes are cheaper, so you may save money that way).
1 12 to 16-ouce package frozen cooked meatballs
1 15 to 16-ounce can Great Northern beans or cannellini beans (white kidney beans), rinsed and drained
1 14.5-ounce can diced tomatoes with basil, garlic, and oregano, undrained (if you can't find the kind with seasoning in it, just add about a teaspoon or less of each when adding the tomatoes).
1 10-ounce package frozen mixed vegetables
1 cup dried small pasta (such as macaroni, small shell, mini penne, or rotini)
crusty bread (optional)
shredded Parmesan cheese (optional)

  1. In a 4-quart Dutch oven (or just a big pot), combine broth, meatballs, beans, undrained tomatoes, and vegetables. 
  2. Bring to a boil. Stir in pasta. 
  3. Return to boiling, then reduce heat. Simmer, uncovered, about 10 mins. or until pasta is tender. 
  4. To serve, ladle soup into bowls. If desired, serve with bread and sprinkle each serving with Parmesan cheese. Makes 6 to 8 main-dish servings.
 Mmmmm, yummy! Enjoy!

Recipe from Better Homes and Gardens Anyone Can Cook- Step-by-Step Recipes Just for You. Meatball and Vegetable Soup with Pasta recipe pp. 380.


Monday, November 26, 2012

Lindsey Stirling- Crystallize

I wanted to do something Christmas, but I know that some people (like my husband) who are complete Scrooges and say "No Christmas until December 1st!" (J/K Sweetheart...I still love you :) ) So I thought I'd post a song I really love, but is also wintery. This one is by the awesome Lindsey Stirling who is an AMAZING violinist and performer. She makes some awesome arrangements and original music and on top of that, she dances while she plays the violin. Check it out!


BEST ACTION SCENE EVER!

Of course, that title is sarcastic. This is, without a doubt, the worst action scene ever and it is hilarious! The only thing I don't find funny at all are the poor horses used for this. Not. Cool. But the rest will have you in stitches. My personal favorite is the jeep. XD


Monday, November 19, 2012

Shredded BBQ Chicken

This recipe is seriously my favorite thing. First of all, it's yummy, and I like yummy food. Second, it takes only two (yes 2!) ingredients, so it's super cheap. Third, it makes a lot. And fourth, the best part, it's a crock pot recipe. And not one of those crock pot recipes that has a million steps like, "Make sauce on stove stop. Bake chicken in the oven. Place sauce in crock pot for 1 hour. Then add chicken. After 3 hours, add vegetables. Cook for 2 more hours."  Which, by the way, totally defeats the purpose of having a crock pot. Seriously, these things were made to throw food in and magically have it turn into a delicious dinner hours later.  But this recipe is not like those. This is one of those one-step-and-you're-done-all-day crock pot recipes. Perfect! :)

Ingredients:

1 lb. of chicken (about 3-4 large chicken breasts)
1 bottle of your favorite BBQ sauce


That's IT! Woot! :D


Place chicken and sauce in crock pot.


This brand is really, really good. I would highly recommend it. Something else to note as well, this bottle is pretty big, so if you do buy a bigger bottle instead of the regular size, you'll want to add only half of the bottle.

After that, cook on low for 8 hours. You can also cook on high for 4 hours, but I think it turns out better and easier to shred if you do 8 on low. 


Next, shred the chicken and stir with the sauce. Heat through.


Serve the traditional way on buns, or...


In a tortilla with lettuce and cheese! Mmmmm!

This recipe can also be made using a pork roast, which I haven't done yet, but I'm sure it would be absolutely yummy! :) Enjoy!

Carry Scissors in Your Car!

I just got done reading this article written by a mother about how her daughter was almost strangled to death by the seat belts in their car. Such a terrifying experience! I thought it was very eye opening, so I'm sharing this with everyone.

Here's the story:
http://www.sallycphotography.com/archives/2005


Kelly Clarkson- Dark Side

I absolutely LOVE this song. The meaning is beautiful and I love that music box part in the beginning. This song is such a great reminder to love people despite their darkest parts of who they once were and help them become their better side. Love it. :)


Change of Seasons

And here we are with the Video of the Week! I love Avatar: The Last Airbender, and ended up watching The Legend of Korra (the sequel to the latter). I liked it in the beginning, but the plot steadily went a little downhill for me in the end. I could get into a whole discussion of how if only Nickelodeon would have given the creators another season in the first place instead of just one, this wouldn't have happened, but I'll pass that and just say that for the most part, Korra was enjoyable. But I just love this video that MentalProdigy made of my favorite episode in the series. Fabulous job! Enjoy!


Sunday, November 18, 2012

My Disappointment in Fashion

So, I just got done with being pregnant seven months ago. My maternity clothes were the cutest ever. I loved wearing them. I felt adorable and especially pretty in them.
After having the cutest baby ever, and looking in my old wardrobe, I decided it's probably time to get at least a few new things. From what I had surveyed while I was pregnant, it seemed that fashion was a little out of what I usually like wearing, but that was probably just the trendy stuff I was seeing that would be out of style in a few months, right? WRONG!
What I see in stores and in magazines is horrendous. I'm literally terrified. It's like someone took the worst of the worst from every era, broke every rule, and threw it all in a blender. Oh, and the more plaids, polka dots, stripes, and whatnot you mix, the better. Uggghhhh....

One store that I absolutely {used to} love was Down East Basics. Lovely, modest, well-fitting, and classy. I could always count on finding something there. Recently though, within about the last year or two, the clothing line has steadily gone downhill, I'm sad to say. The last few times I've ventured in there, I've tried on about half the store and come out empty handed. "Ooh, this looks cute...too tight in the shoulders. Next size up? Too large. How about this? Um...I look like an over-sized daffodil...This one? Eh...It's made for twiggy girls. What about this? Not what I expected..."

Needless to say, I've been pretty disappointed in my once favorite store. I do get their magazine and emails though and look through them before throwing them away. I got my November issue in the mail a couple days ago and finally found some time to sit down to take a look at it.


Well, the cover looks harmless. Maybe things will be better. 


First page. Maybe not what I'd be dying to wear, but it is nice. This could be a good issue!

Now this is really cute. I love the striped T under that cardigan. I know what I'd like for Christmas. ;)


Hmmm, not my fav, especially the scarf. The dress on the right is cute, but I don't see it looking right on me...moving on.


Ugh, not a fan of the ugly colored, sequin covered fish tail and the seemingly armless lady. The last picture was okay, this one, not so much, which is okay because that happens. The next one will be good, right?


Okay, I was in total shock when I saw this. The one on the right, not so bad really, okay at best, but the one on the left... O.O
 
And what may be wrong with this monstrosity? EVERYTHING. It's like someone decided to combine Paul Bunyan and a 50's housewife. Can't find the time to take care of the household chores and chop your firewood? That's what this outfit was made for, honey.

Seriously though, who wears pearls with...that? Nothing feminine about the homeless man heels either. And the socks? Um, who wears socks with a skirt anyway? Especially frumpy thrift store ones?


I just love wearing my over sized T-shirt while sitting on my display table in front of the stairs, don't you?
Okay, this was actually really cute. I would wear either of those. Everything about these two looks great.

The outfit on the right is so ugly you hardly even pay attention to the one on the left. Upon showing it to my husband, he was immediately reminded of this:

Yeah, me too. 

Once I had gotten over my split second, initial panic and took a double take of what I thought to be a naked lady in a clothing magazine (super ironic), I vowed I would never ever ever ever ever wear anything that looked the same color as my skin. Ever.


What is that pink frilly thing hanging out of her potato sack? O.o


You know the long things hanging off your shoulders? Yeah, they're called sleeves. Poor thing doesn't even know how to dress herself. Tut-tut. 
Oh, and btw, on the right, Worst. Necklace. Ever. Both of them.


And now we run into a few things that aren't so bad. I like the design on the skirt. Not a fan of the plaid though. It's okay.

Both of these are good, but the one on the left is better. Except for the necklace...


Thank goodness they still have the basics. 


Pay no attention to the barf colored shawl on the right. 
On the left: Now THIS is the way to do a plaid shirt.With jeans. Not a banana skirt.
THIS

NOT this. Ever.


Not huge on those leggings, but the outfit is all right. I'd like jeans better. The outfit on the right would be great if you threw the clown socks out.


This headband is actually really cute. Very pretty. :)


Thank goodness they don't expect me to decorate my house the same way they dress themselves. The home decor section is actually really nice, I must say.

And there you have it. Looks like I'll be wearing my old, out of date stuff until this all passes. *sigh*

Pumpkin Chocolate Chip Cupcakes

This recipe is so super easy to make, takes only a few ingredients, and tastes de-lish (a perfect combination)!

Here's what you'll need:


  • 1 box of yellow cake mix (I thought that I had a yellow cake mix, but found that I only had a white cake mix, so I used that instead. It turned out just fine and delicious still, so if you are fresh out of yellow cake mix, but have white, it will work too).
  • 1 small can pumpkin 
  • 1 bag of chocolate chips
  • You will also need the ingredients listed on the back of the cake box, which typically consist of oil, eggs, and water, to varying amounts.
And that's all! Easy schmeasy! ;)

How To:

Prepare the cake mix according to the box directions, like so.


I love using my Kitchen Aid mixer. One of the Best. Gifts. Ever.

Add pumpkin and chocolate chips.

Mix well! :)

Put cupcake cups into a muffin tin and pour batter into each, filling about 1/2 to 3/4 full.

Bake as directed on the cake mix box. You may need to do a little more time though since the pumpkin will add more moisture to everything.

When they are done, take them carefully out of the muffin tin with a knife or a fork so you don't singe your fingers. Put them on a baking rack to cool.


These really aren't this yellow. They are more orange. I have no idea why the picture looks yellow, lol! :P


While they are cooling, you can make this cream cheese frosting to go on top!

Cream Cheese Frosting:


  • 2 Tbs. softened butter
  • 3 oz. pkg. softened cream cheese
  • 2 cups powdered sugar
  • 1/2 tsp. vanilla
In a small bowl, blend butter and cream cheese. Gradually add powdered sugar, beating until smooth. Add vanilla.

Last, but certainly not least, frost your cupcakes.


This recipe can also be made into a cake instead! Just put the batter into a greased 9x13 baking dish or bunt pan. Still bake as directed on the cake box, but make sure to add 20 mins. to the total bake time. This is important because if you don't, your cake will (obviously) come out really gooey and gross, and then you'll think this recipe stinks, which is doesn't, and you'll miss out on yummy pumpkin awesomeness. ;)

Enjoy! :)

Saturday, November 17, 2012

Our Super Duper Super Mario Bros. Halloween! Part 3: Costumes

So I'm guessing that you're all probably wondering how I made these fun costumes, right? Well, I'll tell you, but be warned that I won't have a lot to show since my costume was made years ago, Brandon's was mostly stuff found at the thrift store, and I didn't take any pictures of the making of Kessie's. But, for anyone interested, here's what I did:

Princess Daisy Costume:


So, I know it's not exact, but it was the best I could come up with. And yes, this picture of me looks old because...it is.

  1. I bought the shirt from the thrift store. I was looking for something that had short sleeves and was a little "princess"-like. I then took some green and white felt and cut out a big oval and a daisy pattern. Then I used pins to attach it to the shirt. You could sew it as well, or even use hot glue, but if you do, do NOT put it in the dryer after washing.
  2. The skirt was sewn using a simple poodle skirt pattern that can be purchased from any sewing store. The fabric is just a yellow cotton that matches the shirt well so that it all looks like one dress.
  3. The sash is very simple to sew and was made from orange cotton material. It's about 9 inches in width, and then folded over (so that it's 4.5 inches when being worn). I did this so that the bow in back would be big and spread out. It's also about 3 yards in length. 
  4. The gloves came from my mom's stash of kid dress ups. It's a wonder my hands fit them, but I'm sure that it wouldn't be too hard to find gloves at either the thrift store or a costume shop.
  5. I got the crown from a dollar store. It was actually quite a bit bigger, so I cut it smaller to the size I wanted, and then stapled it together. Then I took some felt and a green craft jewel to make the daisy in the middle.
  6. The earings were also made from the same items as the crown flower, but I attached them with hot glue to some old stud earings I didn't care about anymore.
  7. Last, and probably least, I just used a pair of white dressy shoes. I chose flats because I really don't love high heels.
And that's that! Moving on to Luigi:


Yes, this is an old picture too. Peach and Mario's costumes were made the same way too, in case you are wondering.
  1.  The overalls were purchased at a thrift store. Unfortunately, guys overalls must be in extremely low supply, because these poor guys were unable to find them in men's sizes. So yes, they are wearing girl overalls, and if you choose to do things this way, you too will most likely have to wear girl overalls. Sorry.
  2. The shirt was also bought at a thrift store. Ideally, it should actually be long sleeves, but I didn't even realize this until actually looking at a picture of Luigi later. So if short sleeves is all you can find, it will do.
  3. The gloves were purchased at Walmart during the winter season, which was nice and kept his hands warm. We lost the gloves though and later had to use white, leathery gardening gloves instead.
  4. The hat was another thrift store item (although I would suggest thoroughly washing it before wearing it). We cut out a white circle, and a green L, and hot glued them onto the hat.
  5. The mustache was simply cut out from black felt and stuck on with double sided tape.
And you're done! Woot!

And now, for the best costume, little Toadette:


  1.  We'll start with the hat. So, what I did was I took a shower cap, laid it out flat, and measured how big the circle was. From that, I cut out a circle on my fabric (pink cotton). After that, I did a basting stitch around the outside or the circle and pulled on the thread to gather it. Then I took a baby cap and attached the gathered circle to it, making sure to do this inside out so I wouldn't have any raw edges showing. Of course, you'll have to make sure to leave an opening someone so you can turn it back to the right side, so don't forget! Once it's back to the right side out, fill it with some stuffing (not too much though or else it won't fit right on your little one's head). After that, hand stitch the opening closed. Cut out 5, 3.5 inch circles from white felt and hot glue them to the hat. I also added a strap made from leftover material from the hat so the hat could stay on better. I just made two strips with velcro so that it would be comfortable putting on and taking off.
  2. I actually made two different kinds of braids. My first idea that I did for the local convention was to use yarn. It was simple, and I just decided what length I wanted the braids and wrapped it around and around, then sectioned it all off into three parts (plus a small top to attach it to the hat) and tied the sections off with more yarn.
  3. The second kind of braids I made were much better looking. I made two "tubes" out of the same fabric used for the hat and placed three foam balls inside. Then I tied some thread to section them off. After that, I hot glued some five white felt circles to the end of the braids. Then I simple sewed the braids onto the hat. I sewed them on a little more towards the back so that they wouldn't get in baby girl's way.
  4. The shoes were made from a baby booties pattern I got from my sewing class a few years ago. I just used brown knit fabric for those.
  5. For the dress and the vest, I used this pattern: 
Pattern B is what I used. After the dress was done, I added some very thin, white rick-rack to the bottom of it.
The vest was made with the same pattern, but I shortened the length. Then I added thick, yellow rick-rack around the outside.

And there ya have it! A whole family of Mario characters!

 The mystery box we made held all the candy we passed out.

 Not the best picture, but here's the whole creation all together!

Princess Daisy Picture: http://www.freewebs.com/princessdaisy178/
Luigi Picture: http://en.wikipedia.org/wiki/Luigi
Toadette Picture: http://www.mariowiki.com/toadette